Microsoft Azure has added a neat feature to App Services called MySQL In App. This feature allows you to host a MySQL instance inside of the resources of your App Service Plan you are already paying for. This is a great feature for setting up a blog or having a small database handy local to your website, API or WebJob. Note that the product was released in 2016, but Azure still recommends that it only be used for small workloads and not production systems due to the auto scale not being supported and a few other factors.
Start in Microsoft Azure App Services
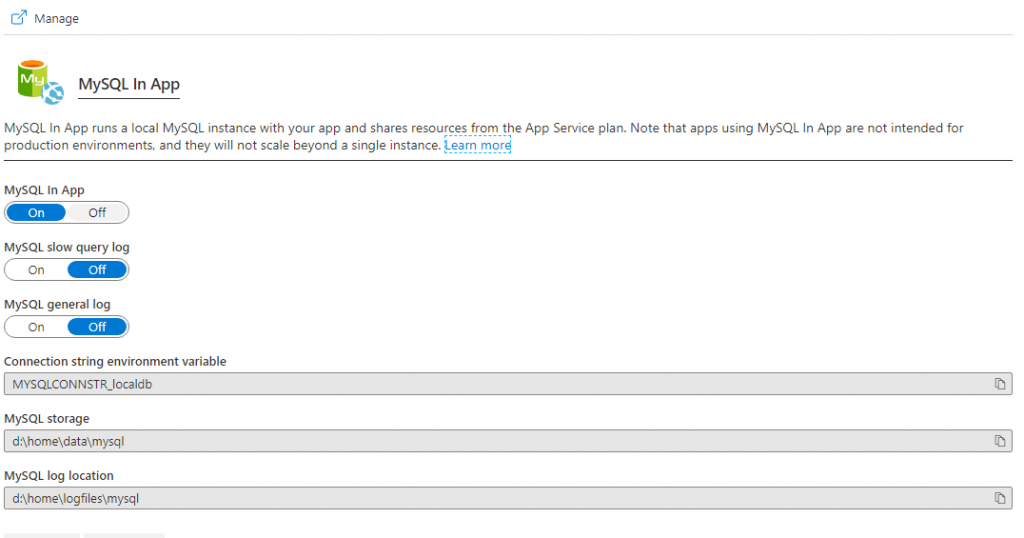
To set up MySQL In App, all you have to do is open your blade for your App Service, scroll under the Settings header to MySQL In App and click on it. Then click On under MySQL In App on the pane.

Once you do this, you just have to wait a few moments and your MySQL In App will be ready for you to use. You’ll see something like this below when it is ready for you to use. Notice that your Connection string environment variable is called MYSQLCONNSTR_localdb. We will go find this file soon. Also notice the Manage link at the top of the pane. This will take you to phpMyAdmin, which is a handy tool for managing your MySQL database.

Tweak your Azure App Service
Next, you will want to go ahead and enable Always on, under your Configuration -> General Settings as if this is not set, the system will shut down your database during periods of inactivity and it may not come back up when the server is woken back up.

Get MySQL connection information
Finally, you’ll want to go ahead and retrieve a few pieces of information that will be helpful for you. First, click Manage to open phpMyAdmin. It’ll pop open a new window with the phpMyAdmin tool. Notice at the top of the window it’ll display the IP and port number your database is running on. You’ll want to copy this information. The database is only accessible from this machine, so the IP is 127.0.0.1, but the port follows that like in the image below.

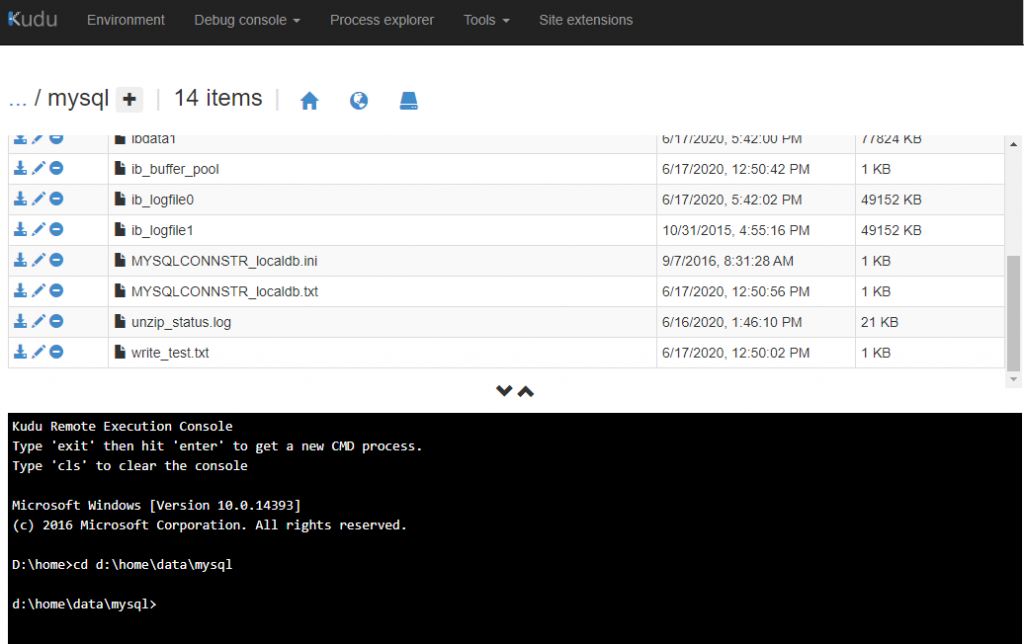
Now go get your username and password. This information is in the MYSQLCONNSTR_localdb.ini file in d:\home\data\mysql as we saw in the MySQL In App pane earlier. To get this file, the best way is to go to Advanced Tools on the blade for your App Service.

Once here, you click Go in the Pane and this opens Kudu Services in a new tab. In here, click on Debug console at the top and choose CMD. Type in
d:
and press enter. Then type:
cd d:\home\data\mysql
and press enter. This will take you to the path and you’re GUI list will load above the console window. If the GUI doesn’t not change, you can just click on data then click on mysql.
Here you can download the MYSQLCONNSTR_localdb.ini file, open it with Notepad and get your username and password from the connection string stored inside.

Put Azure MySQL In App to use
Now that you have the IP, port, username and password, you are prepared to install whatever software you want, like WordPress or Drupal, or build your own custom software and take advantage of having a local MySQL database there to work with.
As you can see, this new tool is easy to setup and once you have the parts you need you are ready to go! Happy coding!
We utilize tools like Azure App Services and MySQL in our cloud migration deployments. Read about our Cloud and DevOps service and read a case study about how we were able to help a small business with our services.


Ahmet Coşkun
November 13, 2020 at 9:59 amThank you
Jake • Post Author •
November 13, 2020 at 3:09 pmI’m glad the article was able to help you!
Juana Li
November 27, 2020 at 7:29 pmYour tutorial is very nice! However I cannot find using what credential to login PHPMyAdmin at the step of finding the port of the database. Could you specify that? Thanks!
Juana Li
November 27, 2020 at 7:53 pmI figured myself. I need to have something deployed on the site(like an index.htm) and also a deployment user before I could access PHPMyAdmin.
Jake • Post Author •
November 28, 2020 at 12:03 amI’m glad the tutorial helped you!
Doris Mills
January 18, 2021 at 11:45 amGreat Information!
Jake • Post Author •
January 18, 2021 at 2:18 pmThank you!